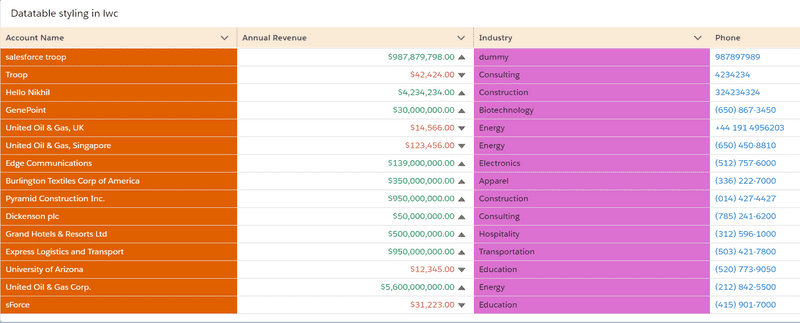
Datatable Styling in LWC
You will learn the following things
- Create a new component
- Write Apex Class to fetch Account records
- Fetch data to LWC from Apex
- Create lightning datatable and load the account data to datatable
- hide datatable checkbox
- add slds text color to the table column
- add an icon to the column with positions
- add a background color to the column cell using slds colors
- upload external CSS to the static resources
- loading external CSS to component
- adding an external CSS class to the column cell
- adding an external CSS class to the table header
Video Tutorial
Code
- Create Lwc component
datatableDemoand add the following code to the respective files.
datatableDemo.html
<template>
    <lightning-card title="Datatable styling in lwc">
        <template if:true={tableData}>
            <div class="myTable">
            <lightning-datatable
            key-field="Id"
            data={tableData}
            columns={columns}
            hide-checkbox-column
            ></lightning-datatable>
        </div>
        </template>

    </lightning-card>
</template>
datatableDemo.js
import { LightningElement, wire } from 'lwc';
import getAccounts from '@salesforce/apex/tableController.getAccounts'
import {loadStyle} from 'lightning/platformResourceLoader'
import COLORS from '@salesforce/resourceUrl/colors'
const COLUMNS = [
    {label:'Account Name', fieldName:'Name',  cellAttributes:{
        class:{fieldName:'accountColor'}
    }},
    {label:'Annual Revenue', fieldName:'AnnualRevenue', type:'currency', cellAttributes:{
        class:{fieldName:'amountColor'},
        iconName:{fieldName:'iconName'}, iconPosition:'right'
    }},
    {label:'Industry', fieldName:'Industry', type:'text', cellAttributes:{
        class:{fieldName:'industryColor'}
    }},
    {label:'Phone', fieldName:'Phone', type:'phone'},
]
export default class DatatableDemo extends LightningElement {
    tableData
    columns = COLUMNS
    isCssLoaded = false

    @wire(getAccounts)
    accountsHandler({data, error}){
        if(data){

            this.tableData = data.map(item=>{
                let amountColor = item.AnnualRevenue <500000 ? "slds-text-color_error":"slds-text-color_success"
                let iconName = item.AnnualRevenue <500000 ? "utility:down":"utility:up"
                return {...item,
                    "amountColor":amountColor,
                    "iconName":iconName,
                    "industryColor":"slds-icon-custom-custom12 slds-text-color_default",
                    "accountColor":"datatable-orange"
                }
            })
            console.log(this.tableData)
        }
        if(error){
            console.error(error)
        }
    }

    renderedCallback(){
        if(this.isCssLoaded) return
        this.isCssLoaded = true
        loadStyle(this, COLORS).then(()=>{
            console.log("Loaded Successfully")
        }).catch(error=>{
            console.error("Error in loading the colors")
        })
    }

}
datatableDemo.js-meta.xml
<?xml version="1.0" encoding="UTF-8"?>
<LightningComponentBundle xmlns="http://soap.sforce.com/2006/04/metadata">
    <apiVersion>50.0</apiVersion>
    <isExposed>true</isExposed>
    <targets>
        <target>lightning__AppPage</target>
    </targets>
</LightningComponentBundle>- Create an Apex class
tableController.clsand add the following code to the file.
tableController.cls
public with sharing class tableController {
    @AuraEnabled(cacheable=true)
    public static List<Account> getAccounts() {
        return [SELECT Id, Name, AnnualRevenue, Industry, Phone from Account];
    }
}- Create a file on your desktop name it
colors.cssand add the following code.
colors.css
.datatable-orange{
  color:#fff;
  background-color:#e06000;
}
.datatable-orange:hover{
  color:#000;
  background-color:#e06000;
}
.myTable table>thead .slds-cell-fixed.slds-has-button-menu, .myTable table>thead .slds-cell-fixed.slds-has-button-menu:hover{
  background: antiquewhite;
}- Upload the 'colors.css` to the static resources.
Final Output
Now place your component to the record page. You will see the following output

