Hello world using LWC
Before creating the Lightning Web Component make sure you have completed the Salesforce DX environment setup and Salesforce DX project setup section.
Create a Lightning Web Component
- In VS Code, open the Command Palette by pressing
Ctrl+Shift+Pon Windows orCmd+Shift+Pon macOS. - Type
SFDXand SelectSFDX: Create Lightning Web Component.

-
Type
helloWorldas the name of the new component and pressEnter.Always use the first letter as lowercase, While naming LWC components. We use the camel case name to the component i.e., helloWorld.
- Again, Press
Enterto accept the defaultforce-app/main/default/lwc. - Goto your
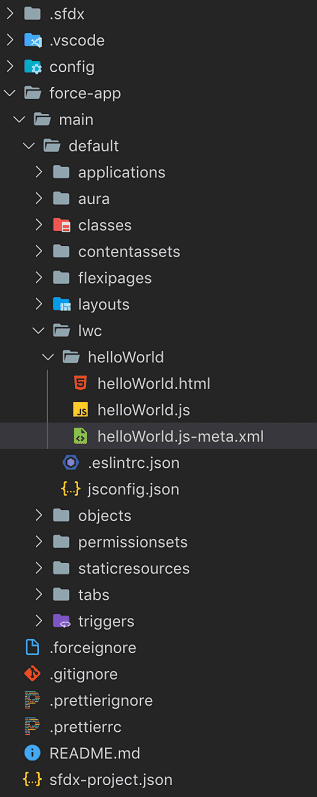
lwcfolder, you will see one new component with the namehelloWorldgets created.

- If you see the
helloWorldcomponent. It has three files helloWorld.html- This file contains your component HTML
Every UI Component must have an HTML file with the root tag
<template>
-
helloWorld.js - This file defines our component and helps to bind the data to the UI.
The class name should always be Pascal Case i.e., the first letter of each word is capitalized
- helloWorld.js-meta.xml - This configuration file defines the metadata values for the component. Also, we specify which type of lightning page this component can be added.
html,jsandmeta.xmlfile is mandatory for any component. There are other optional files likecss,extra js filetest file,SVG iconyou can add to the component based on your requirement
Add the following code to the corresponding file of your project. Don't worry will learn the meaning of each and everything going forward.
<template>
  <lightning-card title="HelloWorld" icon-name="custom:custom14">
    <div class="slds-m-around_medium">
      <p>Hello, {greeting}!</p>
      <lightning-input
        label="Name"
        value={greeting}
        onchange={changeHandler}
      ></lightning-input>
    </div>
  </lightning-card>
</template>import { LightningElement, track } from "lwc";
export default class HelloWorld extends LightningElement {
@track greeting = "World";
changeHandler(event) {
this.greeting = event.target.value;
}
}<?xml version="1.0" encoding="UTF-8"?>
<LightningComponentBundle xmlns="http:/soap.sforce.com/2006/04/metadata" fqn="helloWorld">
<apiVersion>46.0</apiVersion>
<isExposed>true</isExposed>
<targets>
<target>lightning__AppPage</target>
<target>lightning__RecordPage</target>
<target>lightning__HomePage</target>
</targets>
</LightningComponentBundle>Deploy helloWorld component to Org
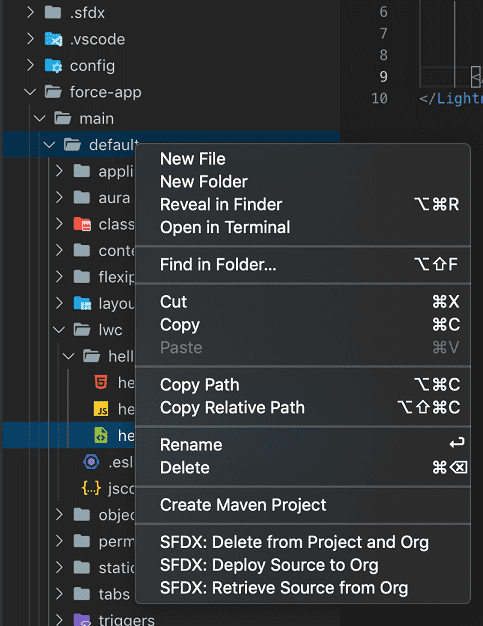
Right-clickthe default folder.- Click
SFDX: Deploy Source to Orgfrom the options

- In the Output tab of the integrated terminal, view the results of your deployment. You should have also received a notice that
states: SFDX: Deploy Source to Org ... ended with exit code 0. This means that the command ran successfully.

Add Component to Sales App in Lightning Experience
- In VS Code, open the Command Palette by pressing
Ctrl+Shift+Pon Windows orCmd+Shift+Pon macOS. - Type
SFDXand SelectSelect SFDX: Open Default Org - Click the
app launcher iconit will open the App Launcher, then clickSales. - Once
Salesapp is opened, Click thegear iconshown in the top right corner, then clickEdit Page. It will open the Lightning App Builder - Drag the
helloWorldLightning web component from the list of custom components to the top of the Page Canvas and ClickSave.

- Click
Activate. - Click
Assign as Org Defaultand then clickSave - Click
Saveagain, then clickBackto return to the Home page. - Refresh the page to view your new component.

- Hurray!! You've finally made your first Lightning web component!