LWC IntroductionWhy Lightning Web ComponentLWC Browser supportSalesforce DX environment setupSalesforce DX project setupHello world using LWCOne-Way Data BindingTwo-Way Data Binding (@track)Conditional Renderingfor:each loopiterator loopRender multiple templateParent to Child Communication with string dataParent to Child Communication with Array/Object dataParent to Child Communication on action at parentParent to Child Communication by calling the Child method from Parent component.Child to Parent Communication by simple actionChild to Parent Communication by passing data on actionChild to Parent Communication by event bubbling
Child to Parent Communication by passing data on action
In this section also we talk about the same dispatch Events concept again.
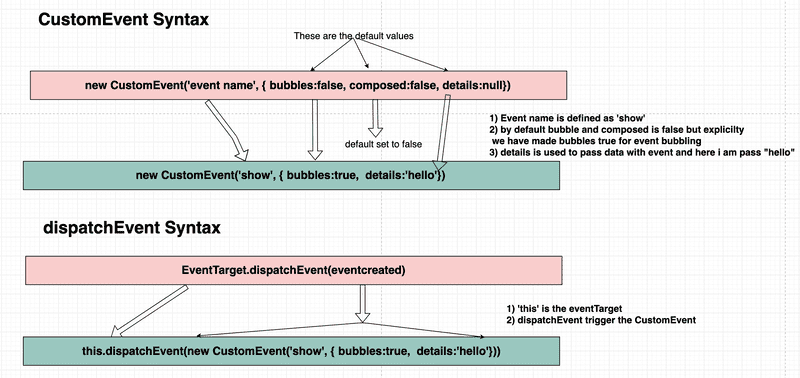
Create and Dispatch Events
To create an event, use the CustomEvent() constructor.
- The
CustomEvent()constructor has one required parameter, which is a string indicating the event type. - You can use any string as your event type But recommend are
- No uppercase letters
- No spaces
- Use underscores to separate words
- Don’t prefix your event name with the string on, because inline event handler names must start with the string on
- To dispatch an event, call the
EventTarget.dispatchEvent()method. - In LWC
EventTargetisthis

Complete demo of the components.

How to pass data from child to parent component
- Create two LWC components
navbarParentComponentandnavbarChildComponent. - Create Css file in both the components.
- Add the code to the corresponding file from the code given below.
navbarParentComponent
navbarParentComponent.js
import { LightningElement } from 'lwc';

export default class NavbarParentComponent extends LightningElement {
    selectedPlayer = null;
    navList = [
        {
            id: 1,
            name: 'Virat Kohli',
            imgUrl:
                'https://www.cricbuzz.com/a/img/v1/152x152/i1/c170661/virat-kohli.jpg',
            country: 'India',
            rating: '922',
            position: '1',
            selected: false
        },
        {
            id: 2,
            name: 'Steven Smith',
            imgUrl:
                'https://www.cricbuzz.com/a/img/v1/152x152/i1/c170624/steven-smith.jpg',
            country: 'Australia',
            rating: '913',
            position: '2',
            selected: false
        },
        {
            id: 3,
            name: 'Kane Williamson',
            imgUrl:
                'https://www.cricbuzz.com/a/img/v1/152x152/i1/c170733/kane-williamson.jpg',
            country: 'New Zealand',
            rating: '887',
            position: '3',
            selected: false
        },
        {
            id: 4,
            name: 'Joe Root',
            imgUrl:
                'https://www.cricbuzz.com/a/img/v1/152x152/i1/c170942/joe-root.jpg',
            country: 'England',
            rating: '710',
            position: '4',
            selected: false
        },
        {
            id: 5,
            name: 'David Warner',
            imgUrl:
                'https://www.cricbuzz.com/a/img/v1/152x152/i1/c170635/david-warner.jpg',
            country: 'Australia',
            rating: '687',
            position: '5',
            selected: false
        }
    ];
    selectedNavHandler(event) {
        const playerName = event.detail;
        this.selectedPlayer = this.navList.find(
            item => item.name === playerName
        );
    }
}
navbarParentComponent.html
<template>
    <lightning-card title="Event with Data" icon-name="custom:custom14">
        <div class="slds-m-around_medium">
    <h3>
        select your favourite cricketer in child component and see details in
        parent component
    </h3>
    <div class="flex">
        <p>I am parent component</p>
        <c-navbar-child-component nav-list={navList} onselection={selectedNavHandler}></c-navbar-child-component>

        <template if:true={selectedPlayer}>
            <div class="card">
                <div>
                    <img src={selectedPlayer.imgUrl} alt="Avatar" style="width:100%" />
                </div>
                <div class="container">
                    <p><strong>Player Name:</strong> {selectedPlayer.name}</p>
                    <p><strong>Ranking:</strong> {selectedPlayer.position}</p>
                    <p><strong>country:</strong> {selectedPlayer.country}</p>
                    <p><strong>Rating:</strong> {selectedPlayer.rating}</p>
                </div>
            </div>
        </template>
    </div>
</div>
</lightning-card>
</template>
navbarParentComponent.css
h3{
    font-size: 20px;
}
.card {
    box-shadow: 0 4px 8px 0 rgba(0, 0, 0, 0.2);
    transition: 0.3s;
    max-width: 400px;
    display: flex;
    max-height: 250px;
    border-radius: 5px;
    margin: auto;
}

.card:hover {
    box-shadow: 0 8px 16px 0 rgba(0, 0, 0, 0.2);
}

img {
    border-radius: 5px 5px 0 0;
}

.container {
    padding: 2px 16px;
    max-width: 400px;
}
.center {
    display: block;
    margin-left: auto;
    margin-right: auto;
    width: 50%;
}

.flex {
    display: flex;
    border: 5px solid black;
}
@media screen and (max-width: 768px) {
    .flex {
        flex-direction: column;
    }
}
navbarParentComponent.js-meta.xml
<?xml version="1.0" encoding="UTF-8"?>
<LightningComponentBundle xmlns="http://soap.sforce.com/2006/04/metadata">
    <apiVersion>48.0</apiVersion>
    <isExposed>true</isExposed>
    <targets>
        <target>lightning__AppPage</target>
        <target>lightning__RecordPage</target>
        <target>lightning__HomePage</target>
    </targets>
</LightningComponentBundle>- In the parent component,
navbarParentComponent.htmlwe have created alightning-cardto give our component better looks and feel - Withing the
lightning-cardwe are calling the child componentc-navbar-child-component. - In
navbarParentComponent .jsfile, we have created aselectedPlayerandnavListlocal property and both are initialized with null and array of objects respectively.Apart from properties we have created aselectedNavHandlermethod that will get's called once the child will pass the data. - While calling the child component
c-navbar-child-componentwe are passing down the data ofnavListproperty and also listeining to the event usingonselectionhandler. - Below child component, we are using card to show the details of the selectedPlayer.
navbarChildComponent
navbarChildComponent.js
import { LightningElement, api } from 'lwc';

export default class NavbarChildComponent extends LightningElement {
    @api navList;
    handleNavSelection(event) {
        event.preventDefault();
        const selectEvent = new CustomEvent('selection', {
            detail: event.target.name
        });
        // Fire the custom event
        this.dispatchEvent(selectEvent);
    }
}
navbarChildComponent.html
<template>
    <p>I am Child component</p>
    <div class="vertical-menu">
        <template for:each={navList} for:item="list">
            <a href="javascript:void(0);" class={list.className} name={{list.name}} key={list.id}
                onclick={handleNavSelection}>{list.name}</a>
        </template>
    </div>
</template>
navbarChildComponent.css
:host {
    border: 5px solid red;
    padding: 2rem;
    margin: 2rem;
}
.vertical-menu {
    width: 200px;
}

.vertical-menu a {
    background-color: #00354e;
    border: 1px solid white;
    color: white;
    display: block;
    padding: 12px;
    text-decoration: none;
}

.vertical-menu a:hover {
    background-color: #ccc;
}

.vertical-menu a.active {
    background-color: #01344e;
    color: white;
}
navbarChildComponent.js-meta.xml
<?xml version="1.0" encoding="UTF-8"?>
<LightningComponentBundle xmlns="http://soap.sforce.com/2006/04/metadata">
    <apiVersion>48.0</apiVersion>
    <isExposed>false</isExposed>
</LightningComponentBundle>- In
navbarChildComponentwe have created one public propertynavListthat will recieve the data from the parent. To make it public property we are using@api - Once child component recieve the data we are using
for:eachto loop the data and showing on screen. - We have added a click handler to the list loaded in the child component and on click we are calling
handleNavSelectionmethod. - In
handleNavSelectionmethod we are creating the custom event and passing the data by mapping it todetailproperty. Once event gets created we dispatch it to parent. - Once parent recieve the event it will extract the data using
event.detailand show the selectedPlayer on the screen
this.dispatchEvent(new CustomEvent('close'))- Once
closeevent get's triggered it gonna catch my the methodmodalCloseHandlerwhich is map to thec-modal-child-componentcomponentoncloseattribute. - Once
modalCloseHandlerget called it makes theshowModalproperty false and hide thec-modal-child-componentcomponent
Output
After placing the component on the page, you will see the following output.

