Parent to Child Communication with string data
Parent to child communication is always crucial for building a more significant and reusable component in a large application. The most common communication between parent to child component is by string data.
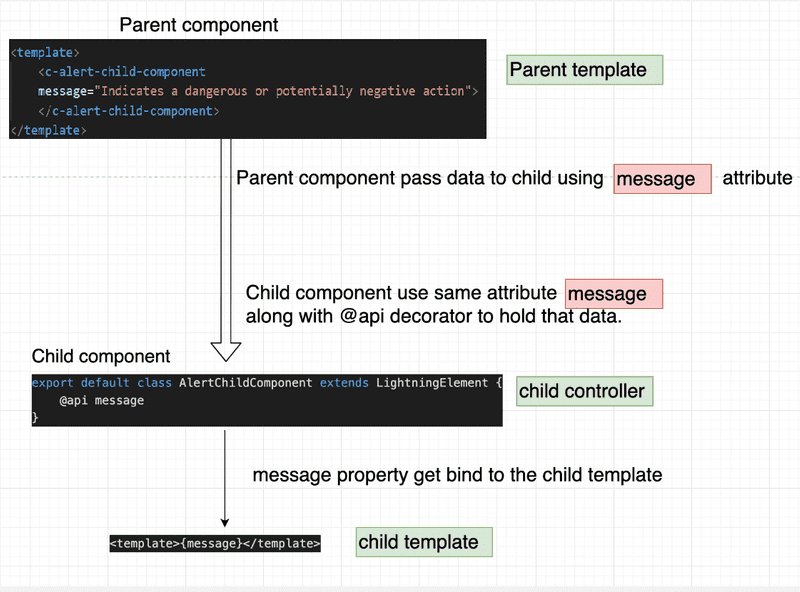
Let's understand how parent component pass string data to child component from the below fig

- First, we compose the child component inside the parent component. In our above example, we have added the child component
alertChildComponent. - In the child component, we will create the property that will hold the parent data, and to hold that data, we decorate that property with
@api. - @api decorator, meaning it is a public variable we can set from outside.
- you can use the string data now in your child component.
Example of Parent to Child Communication with string data
Create two LWC components alertParentComponent and alertChildComponent and add the following code to the respective file.
Parent component
import { LightningElement } from 'lwc';

export default class AlertParentComponent extends LightningElement {}
<template>
    <div class="margin-bottom-2rem">
        <lightning-card title="Parent to child data communication using strings" icon-name="custom:custom14">
            <div class="slds-m-around_medium">
                <div>
                    <c-alert-child-component message="Indicates a dangerous or potentially negative action"></c-alert-child-component>
                    <c-alert-child-component class-name="success" message="Success! Indicates a successful or positive action.">
                    </c-alert-child-component>
                    <c-alert-child-component class-name="info" message="Info! Indicates a neutral informative change or action.">
                    </c-alert-child-component>
                    <c-alert-child-component class-name="warning" message="Warning! Indicates a warning that might need attention.">
                    </c-alert-child-component>
                </div>
            </div>
        </lightning-card>
    </div>

</template><?xml version="1.0" encoding="UTF-8"?>
<LightningComponentBundle xmlns="http://soap.sforce.com/2006/04/metadata">
<apiVersion>48.0</apiVersion>
<isExposed>true</isExposed>
<targets>
<target>lightning__AppPage</target>
<target>lightning__RecordPage</target>
<target>lightning__HomePage</target>
</targets>
</LightningComponentBundle>Explanation of alertParentComponent
In alertParentComponent.html we are calling the alertChildComponent
To embed the child component in our parent component, we need to use the syntax <c-alert-child-component/>
Note - In Lightning Web Components we should conventionally use camelCase (lower case first letter, upper case subsequent words) to name the component and kebab-case (lower case words preceded with c- and spaced with '-' minus sign) when nesting the components in a composition scenario.
Now We have to pass the data to the child component so, we need to use the attribute name that is the same as the public variable name defined in the child component (alertChildComponent) i.e., message in our example.
If your child public property is camelCase as in our case className, then we need to use the attribute as class-name in our child component calling.
So in our example, we are calling four times the alertChildComponent with different message and className
Child component
Explanation of alertChildComponent
In the child component alertChildComponent, we have declared the two properties and made them public by using the @api decorator.
In our template of alertChildComponent, we are using the message property as it is. Which means we are printing the message coming from a parent to the template.
To add a class dynamically to our markup, we are using the getter function. alertClassName, which will check if the className property is coming from parent or not.
If the className comes from parent use, that otherwise ignores it.
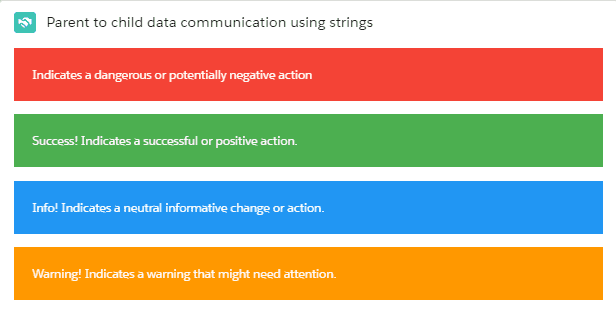
Based on the className we are applying some CSS to the template as shown in the output.
import { LightningElement, api } from 'lwc';

export default class AlertChildComponent extends LightningElement {
    @api message
    @api className

    get alertClassName() {
        return this.className ? 'alert ' + this.className : 'alert'
    }
} <template>
<div class={alertClassName}>
{message}
</div>
</template>.alert {
padding: 20px;
background-color: #f44336;
color: white;
opacity: 1;
transition: opacity 0.6s;
margin-bottom: 15px;
}
.alert.success {background-color: #4CAF50;}
.alert.info {background-color: #2196F3;}
.alert.warning {background-color: #ff9800;}<?xml version="1.0" encoding="UTF-8"?>
<LightningComponentBundle xmlns="http://soap.sforce.com/2006/04/metadata">
<apiVersion>48.0</apiVersion>
<isExposed>false</isExposed>
</LightningComponentBundle>As we don't want alertChildComponent to be exposed on the builder so we keep the isExposed property false
on change demo Output
After placing the component on the page, you will see the following output.
