LWC IntroductionWhy Lightning Web ComponentLWC Browser supportSalesforce DX environment setupSalesforce DX project setupHello world using LWCOne-Way Data BindingTwo-Way Data Binding (@track)Conditional Renderingfor:each loopiterator loopRender multiple templateParent to Child Communication with string dataParent to Child Communication with Array/Object dataParent to Child Communication on action at parentParent to Child Communication by calling the Child method from Parent component.Child to Parent Communication by simple actionChild to Parent Communication by passing data on actionChild to Parent Communication by event bubbling
Render multiple template
What is Multiple templates in a Component.
When we create multiple html file within a single component is called multiple template component. To reference CSS from an extra template, the CSS filename must match the filename of the extra template.
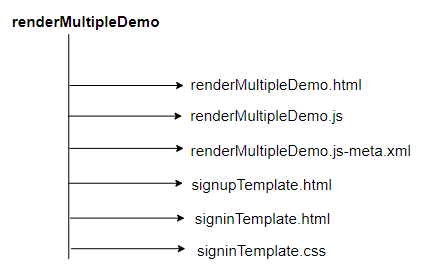
- Till now we have learnt how to create a component and we know each component is consist of html, css, js and js-meta.xml. If we add more html(template) or css to same component then our component will look as shown below.

When to prefer multiple template over if:true/if:false
- if:true/if:false is recommend whenever there is small template to hide and show
- Ideally it's always recommend to break down your component into smallest unit.
- Whenever we have a scenario in which we have same business logic but we want to render a component with more than one look and feel.
- Whenever we have two design in same component but not want to mix the HTML in one file.
What is render() method?
- Render is a method that tells the component which template to load based on some conditions.
- Render always return the template reference
Template loaded by render method replace the complete template.
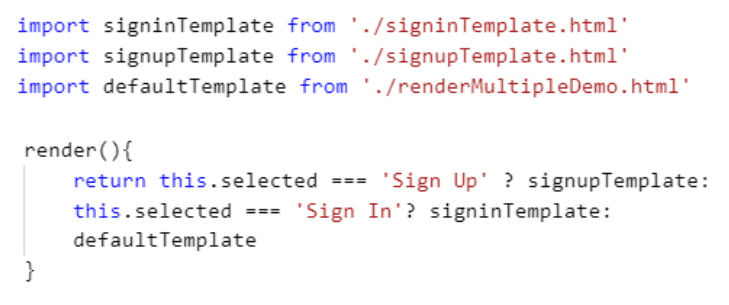
- Below is the syntax by which we import the different templates and used those inside the render method.

fig: Multiple template render method
How to render multiple template in a component
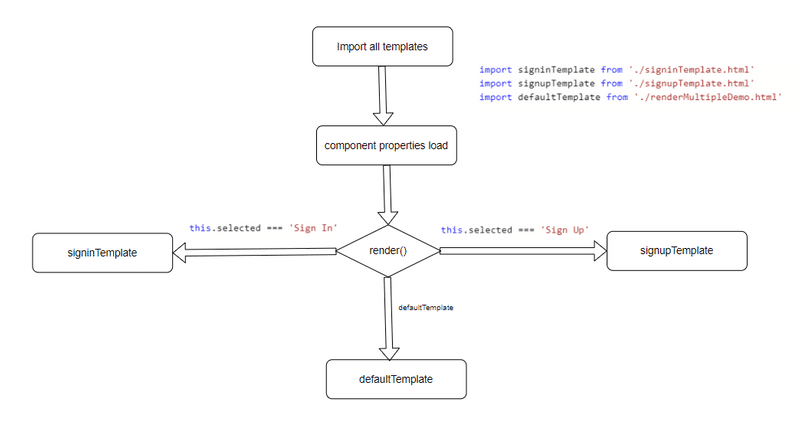
Let see how this whole process work with the below image

- First we will import all the templates into the component js file
- We will create the propety inside the component that will be used for check the conditions.
- Will define the render method thata return the template refrence based on the conditions
- In our case we have three templates
- renderMultipleDemo i.e. default template of the component
- signinTemplate ie. template for signIn form
- signupTemplate i.e. template for signUp form.
- based on the condition appropriate template is loading.
renderMultipleDemo.html
<template>
    <lightning-card title="Render Multiple Template" icon-name="custom:custom14">
        <div class="slds-m-around_medium">
            <h2 class="slds-text-heading_medium slds-m-bottom_medium">Choose your option</h2>

            <lightning-button variant="destructive" label="Sign Up" title="Sign Up" onclick={handleClick}
                class="slds-m-left_x-small"></lightning-button>

            <lightning-button variant="success" label="Sign In" title="Sign In" onclick={handleClick}
                class="slds-m-left_x-small"></lightning-button>

        </div>
    </lightning-card>
</template>
RenderMultipleDemo.js
import { LightningElement } from 'lwc';
import signinTemplate from './signinTemplate.html'
import signupTemplate from './signupTemplate.html'
import defaultTemplate from './renderMultipleDemo.html'
export default class RenderMultipleDemo extends LightningElement {
    selected = null;
    render(){
        return this.selected === 'Sign Up' ? signupTemplate:
        this.selected === 'Sign In'? signinTemplate:
        defaultTemplate
    }
    handleClick(event){
        this.selected = event.target.label
    }
    submitHandler(event){
        if(event.target.label === 'Sign In'){
            console.log("Sign In Successfully")
        } else if (event.target.label === 'Sign Up'){
            console.log("Sign Up Successfully")
        } else {

        }
    }
}
signInTemplate.html
<template>
<lightning-card title="Render Multiple Template" icon-name="custom:custom14">
    <div class="slds-m-around_medium">
    <h2 class="slds-text-heading_medium slds-m-bottom_medium">Sign in Form</h2>

<lightning-input type="text" label="Enter your username"></lightning-input>

<lightning-input type="password" label="Enter your password"></lightning-input>

<lightning-button variant="success" label="Sign In" title="Sign In" onclick={submitHandler}></lightning-button>

<lightning-button variant="destructive" label="Back" title="Back" onclick={handleClick}></lightning-button>

        </div>
    </lightning-card>
</template>
signupTemplate.html
<template>
    <lightning-card title="Render Multiple Template" icon-name="custom:custom14">
        <div class="slds-m-around_medium">
            <h2 class="slds-text-heading_medium slds-m-bottom_medium">Sign up Form</h2>
            <lightning-input type="text" label="Enter your first name"></lightning-input>
            <lightning-input type="text" label="Enter your last name"></lightning-input>
            <lightning-input type="email" label="Enter your Email address"></lightning-input>
            <lightning-input type="password" label="Enter your password"></lightning-input>

            <lightning-button variant="success" label="Sign Up" title="Sign Up" onclick={submitHandler}>
            </lightning-button>

            <lightning-button variant="destructive" label="Back" title="Back" onclick={handleClick}>
            </lightning-button>

        </div>
    </lightning-card>
</template>
signinTemplate.css
h2{
    font-size:20px;
    color:red;
}
renderMultipleDemo.js-meta.xml
<?xml version="1.0" encoding="UTF-8"?>
<LightningComponentBundle xmlns="http://soap.sforce.com/2006/04/metadata">
    <apiVersion>48.0</apiVersion>
    <isExposed>true</isExposed>
    <targets>
        <target>lightning__AppPage</target>
        <target>lightning__RecordPage</target>
        <target>lightning__HomePage</target>
    </targets>
</LightningComponentBundle>
Output
After placing the component on the page, you will see the following output.
